Create and manage interactive shopping center maps with customizable retailer polygons and kiosk locations
What is the Center Map?
The Center Map is an interactive mapping system that allows all users to edit and customize shopping center maps. This powerful tool enables you to create detailed, interactive floor plans with customizable retailer polygons, kiosk locations, and responsive design options for different device types.
The system provides comprehensive map editing capabilities including polygon customization, retailer information display options, kiosk management, and responsive design controls to ensure optimal viewing across all devices and display types.
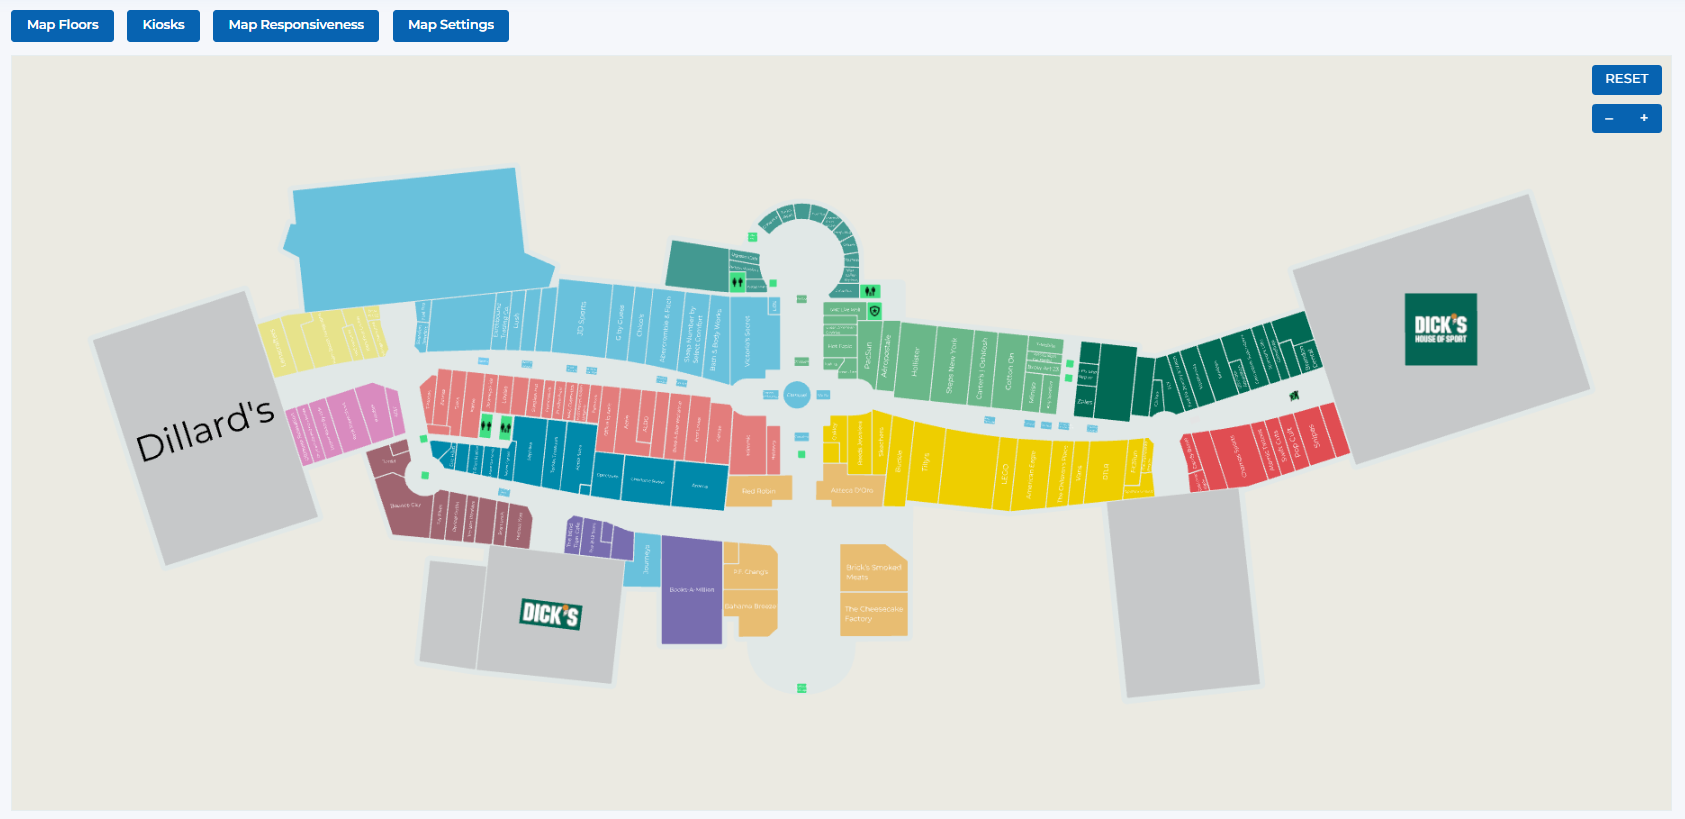
Center Map showing a map of the center with customizable retailer polygons and kiosk locations
Key Features
Visual map editing with drag-and-drop polygon customization
Customize retailer polygons with names, logos, or custom text
Manage touch interactive kiosk locations and configurations
Optimize map display for different device types and screen sizes
Customize map appearance, colors, and visual elements
Manage multiple map floors and levels within the center
Center Map Interface Overview
The Center Map interface provides comprehensive tools for managing interactive shopping center maps:
Manage multiple map floors and levels
- • Add new map floors for multi-level centers
- • Edit existing floor configurations
- • Reorder floors as needed
- • Delete unused floors
- • View floor information and details
Manage touch interactive kiosk locations
- • Add new kiosk locations to the map
- • Edit existing kiosk configurations
- • Assign kiosks to specific retailers or areas
- • View kiosk details and settings
- • Remove kiosks from the map
Configure map display for different devices
- • Preview map on different device types
- • Test display app, desktop, tablet, and mobile views
- • Adjust map scaling and positioning
- • Save responsiveness settings
- • Reset view to default settings
Customize map appearance and behavior
- • Configure map style (2D/3D)
- • Set color schemes and themes
- • Adjust polygon colors and styling
- • Configure zoom limits and controls
- • Set default kiosk icon sizes
Visual map editor with polygon management
- • Click on polygons to edit retailer information
- • Drag and drop to reposition elements
- • Zoom in/out for detailed editing
- • Reset view to original position
- • Real-time preview of changes
Edit selected retailer polygons
- • Select retailer from dropdown menu
- • Choose display type (name, logo, custom text)
- • Adjust size, rotation, and positioning
- • Customize colors and styling
- • Delete unwanted polygons
Map Polygon Editing Features
When you click on a polygon within the map, you can edit it with various options. Polygons can be configured as Retailer, Special, or Custom types:
Polygon Types
Choose the appropriate polygon type based on its purpose and content:
Standard retailer polygons for stores and businesses
Key Features:
- • Select retailer from dropdown list
- • Choose display option (Name, Logo, or Custom Text)
- • Full customization of appearance and positioning
- • Most commonly used polygon type
- • Integrates with retailer management system
Display Options:
- • Retail Name: Show full retailer name (most recommended)
- • Retail Logo: Display retailer logo image
- • Custom Text: Use shortened or custom text for long names
Special polygons for kiosks and amenities
Key Features:
- • Define polygon as either Kiosk or Amenity
- • Assign to specific kiosk or amenity from dropdown
- • Customize appearance and positioning
- • Used for non-retailer map elements
- • Integrates with kiosk and amenity management
Subtypes:
Kiosk
Assign polygon to a specific touch interactive kiosk
- • Choose from available kiosks in dropdown
- • Polygon represents kiosk location on map
- • Integrates with kiosk management system
- • Shows kiosk status and information
Amenity
Assign polygon to a specific center amenity
- • Choose from available amenities in dropdown
- • Common amenities: Restrooms, ATMs, Management, etc.
- • Helps visitors locate important facilities
- • Customizable appearance and labeling
Custom polygons for available spaces and special states
Key Features:
- • Enter custom text for the polygon
- • Perfect for available/leasing states
- • Flexible text input and styling
- • No specific retailer or amenity assignment
- • Full control over appearance and content
Use Cases:
- • Available retail spaces
- • Leasing opportunities
- • Future development areas
- • Special announcements
- • Temporary or seasonal content
Editing Controls
Available controls for all polygon types:
Configure text display and content
- • Text Input: Enter custom text for the polygon
- • Size Control: Adjust text size with +/- buttons
- • Text Color: Choose text color with color picker
- • Font Selection: Choose appropriate font style
- • Text Alignment: Control text positioning within polygon
Adjust polygon size, rotation, and position
- • Size: Adjust polygon size with +/- controls
- • Rotate: Set rotation angle with +/- controls and reset button
- • Offset X: Move polygon horizontally
- • Offset Y: Move polygon vertically
- • Reset to default positioning
Customize polygon appearance with colors
- • Background Color: Set polygon fill color
- • Text Color: Choose text color for readability
- • Icon Color: Set color for polygon icons
- • Color picker for precise color selection
- • Preview colors before applying
Choose between text and image content
- • Text Tab: Configure text-based content
- • Image Tab: Configure image-based content
- • Switch between content types easily
- • Different controls for each content type
- • Preview content before applying
Manage polygon properties and settings
- • Change polygon type (Retailer, Special, Custom)
- • Delete polygon from map
- • Duplicate polygon for similar elements
- • Lock polygon to prevent accidental changes
- • Add notes or descriptions to polygon
Map Settings & Configuration
Comprehensive settings for customizing map appearance and behavior:
Map Style
Choose between 2D and 3D map display
Map Background Color
Set the overall map background color
Accent Color
Primary accent color for map elements
Store Default Color
Default color for retailer polygons
Store Text Color
Default text color for retailer names
Wall Color
Color for building walls and structures
Boundary Color
Color for area boundaries
Base Color
Base color for map elements
Wall Thickness
Thickness of wall lines
Boundary Thickness
Thickness of boundary lines
Overlay Color
Color for map overlays
Overlay Opacity
Transparency level of overlays
Default Kiosk Icon Size
Default size for kiosk icons
Zoom Step
Increment for zoom operations
Zoom In Limit
Maximum zoom in level
Zoom Out Limit
Maximum zoom out level
Selected Zoom In Limit
Zoom limit when polygon is selected
User Permissions & Map Access
All user types have full access to center map editing with appropriate center restrictions.
Map Management Capabilities:
Can edit maps for their assigned center only
Can customize retailer polygons within their center
Can manage kiosk locations in their center
Can adjust map settings and styling
Can manage multiple map floors
Best Practices
Polygon Management
- • Use 'Retail Name' display option for most retailers (most recommended)
- • Use 'Custom Text' for retailers with very long names to improve readability
- • Use 'Retail Logo' only when logos are high quality and clearly visible
- • Keep polygon sizes proportional to actual store sizes
- • Use consistent colors for similar store types
- • Test polygon visibility at different zoom levels
Map Organization
- • Organize retailers by category using consistent colors
- • Keep polygon labels readable at all zoom levels
- • Maintain consistent spacing between polygons
- • Use clear, descriptive custom text for long retailer names
- • Group related retailers in similar areas
- • Regularly review and update polygon assignments
Kiosk Placement
- • Place kiosks in high-traffic areas for maximum visibility
- • Ensure kiosks are easily accessible to visitors
- • Avoid placing kiosks in narrow or crowded areas
- • Test kiosk visibility from different angles
- • Consider visitor flow patterns when placing kiosks
- • Update kiosk locations when store layouts change
Responsive Design
- • Test map display on all device types (desktop, tablet, mobile)
- • Ensure text remains readable at all zoom levels
- • Optimize polygon sizes for different screen sizes
- • Test touch interactions on mobile devices
- • Verify kiosk visibility across all device types
- • Save responsiveness settings after testing
Map Settings Optimization
- • Choose colors that provide good contrast and readability
- • Set appropriate zoom limits for your center size
- • Use consistent styling across all map elements
- • Test map performance with different settings
- • Regularly review and update map settings
- • Document custom settings for team reference
Ready to Manage Your Center Map?
Access the Portal CMS to create and customize interactive maps for your shopping center.
Access Portal CMS