Complete guide to editing map polygons with detailed controls for retailers, special elements, and custom content
How to Edit Map Polygons
Map polygon editing allows you to create detailed, interactive map elements that represent retailers, amenities, kiosks, and custom content. Each polygon can be configured with specific properties, appearance settings, and content options.
The editing panel appears when you click on any polygon in the map, providing comprehensive controls for text, positioning, colors, and content type selection.
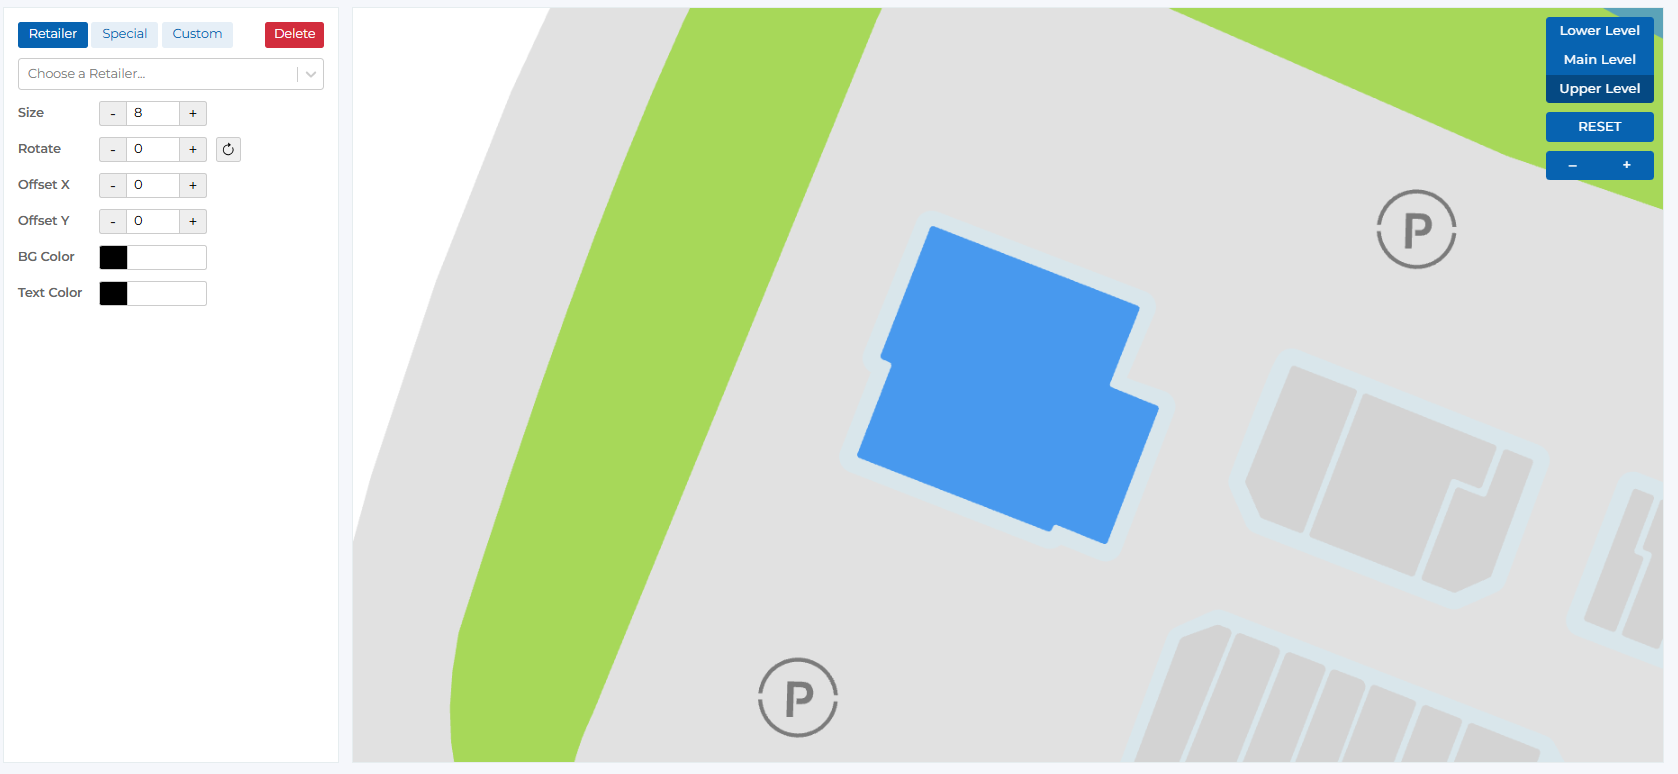
Map polygon editing interface
Polygon Types & Configuration
Choose the appropriate polygon type based on its purpose and content:
Standard retailer polygons for stores and businesses
Key Features:
- • Select retailer from comprehensive dropdown list
- • Choose display option (Name, Logo, or Custom Text)
- • Full customization of appearance and positioning
- • Integrates with retailer management system
- • Automatic updates when retailer information changes
Display Options:
Retail Name
Show full retailer name (most recommended)
- • Displays the complete retailer name
- • Automatically updates if retailer name changes
- • Best for most retail locations
- • Ensures consistent branding
Retail Logo
Display retailer logo image
- • Shows retailer logo instead of text
- • Requires logo to be uploaded to media library
- • Best for well-known retailers with recognizable logos
- • Maintains visual consistency with brand guidelines
Custom Text
Use shortened or custom text for long names
- • Allows custom text input for the polygon
- • Perfect for retailers with very long names
- • Enables creative or abbreviated naming
- • Full control over text content and appearance
Configuration Steps:
- Click on the polygon to select it
- Ensure 'Retailer' tab is selected
- Choose display option (Name, Logo, or Custom Text)
- Select retailer from dropdown if using Name or Logo
- Enter custom text if using Custom Text option
- Adjust appearance and positioning as needed
- Save changes to apply configuration
Special polygons for kiosks and amenities
Key Features:
- • Define polygon as either Kiosk or Amenity
- • Assign to specific kiosk or amenity from dropdown
- • Customize appearance and positioning
- • Used for non-retailer map elements
- • Integrates with kiosk and amenity management systems
Subtypes:
Kiosk
Assign polygon to a specific touch interactive kiosk
Configuration Steps:
- Select the polygon on the map
- Choose 'Special' tab in the customization panel
- Select 'Kiosk' radio button
- Choose specific kiosk from 'Choose a Kiosk...' dropdown
- Customize appearance and positioning
- Save changes to assign kiosk to polygon
- • Choose from available kiosks in dropdown
- • Polygon represents kiosk location on map
- • Integrates with kiosk management system
- • Shows kiosk status and information
- • Updates automatically when kiosk settings change
Available Kiosks:
Amenity
Assign polygon to a specific center amenity
Configuration Steps:
- Select the polygon on the map
- Choose 'Special' tab in the customization panel
- Select 'Amenity' radio button
- Choose specific amenity from dropdown
- Customize appearance and positioning
- Save changes to assign amenity to polygon
- • Choose from available amenities in dropdown
- • Common amenities: Restrooms, ATMs, Management, etc.
- • Helps visitors locate important facilities
- • Customizable appearance and labeling
- • Consistent with center amenity management
Available Amenities:
Custom polygons for available spaces and special states
Key Features:
- • Enter custom text for the polygon
- • Perfect for available/leasing states
- • Flexible text input and styling
- • No specific retailer or amenity assignment
- • Full control over appearance and content
Use Cases:
- • Available retail spaces
- • Leasing opportunities
- • Future development areas
- • Special announcements
- • Temporary or seasonal content
- • Construction zones
- • Event spaces
Content Types:
Text
Text-based content for the polygon
- • Enter custom text in the text input field
- • Perfect for available spaces and announcements
- • Full control over text content and styling
- • Supports multiple lines and formatting
- • Real-time preview of text appearance
Image
Image-based content for the polygon
- • Upload or select image from media library
- • Best for visual announcements or branding
- • Supports various image formats
- • Automatic scaling and positioning
- • Maintains aspect ratio and quality
Configuration Steps:
- Select the polygon on the map
- Choose 'Custom' tab in the customization panel
- Select 'Text' or 'Image' content type
- Enter custom text in the text input field
- Customize appearance and positioning
- Save changes to apply custom configuration
Editing Controls
Comprehensive controls available for all polygon types:
Configure text display and content
Control Details:
- • Text Input: Enter custom text for the polygon
- • Size Control: Adjust text size with +/- buttons (default: 68)
- • Text Color: Choose text color with color picker (default: #101921)
- • Font Selection: Choose appropriate font style
- • Text Alignment: Control text positioning within polygon
- • Multi-line Support: Enter text across multiple lines
- • Real-time Preview: See changes as you type
Control Specifications:
Text Input Field
Large text input for entering custom text
Size Control
Adjust text size with increment/decrement buttons
Text Color
Choose text color with color picker
Adjust polygon size, rotation, and position
Control Details:
- • Size: Adjust polygon size with +/- controls
- • Rotate: Set rotation angle with +/- controls and reset button (default: -20)
- • Offset X: Move polygon horizontally (default: 0)
- • Offset Y: Move polygon vertically (default: 0)
- • Reset to default positioning
- • Precise positioning controls
- • Real-time position updates
Control Specifications:
Size
Adjust polygon size
Rotate
Set rotation angle with reset option
Offset X
Move polygon horizontally
Offset Y
Move polygon vertically
Customize polygon appearance with colors
Control Details:
- • Background Color: Set polygon fill color (default: black)
- • Text Color: Choose text color for readability (default: #101921)
- • Icon Color: Set color for polygon icons
- • Color picker for precise color selection
- • Preview colors before applying
- • Reset to default colors
- • Color consistency across map elements
Control Specifications:
Background Color
Set polygon fill color
Text Color
Choose text color for readability
Icon Color
Set color for polygon icons
Choose between text and image content
Control Details:
- • Text Tab: Configure text-based content
- • Image Tab: Configure image-based content
- • Switch between content types easily
- • Different controls for each content type
- • Preview content before applying
- • Maintain content type consistency
- • Easy content type switching
Content Type Tabs:
Text
Text-based content configuration
Image
Image-based content configuration
Manage polygon properties and settings
Control Details:
- • Change polygon type (Retailer, Special, Custom)
- • Delete polygon from map
- • Duplicate polygon for similar elements
- • Lock polygon to prevent accidental changes
- • Add notes or descriptions to polygon
- • Copy polygon settings to other polygons
- • Export polygon configuration
Available Actions:
Delete
Remove polygon from map
Are you sure you want to delete this polygon?
Duplicate
Create a copy of the polygon
Lock
Prevent accidental changes
User Permissions & Polygon Access
All user types have full access to map polygon editing with appropriate center restrictions.
Map Polygon Editing Capabilities:
Can edit all polygon types in their assigned center
Can assign and configure retailer polygons
Can set up kiosk and amenity polygons
Can create custom polygons for special content
Can delete polygons from their center map
Best Practices
Polygon Type Selection
- • Use 'Retailer' for all active retail stores and businesses
- • Use 'Special' for kiosks, amenities, and non-retail facilities
- • Use 'Custom' for available spaces, leasing opportunities, and temporary content
- • Choose the most appropriate type for the polygon's purpose
- • Consider future changes when selecting polygon type
- • Maintain consistency across similar polygon types
Display Options
- • Use 'Retail Name' for most retailers (most recommended)
- • Use 'Retail Logo' only when logos are high quality and recognizable
- • Use 'Custom Text' for retailers with very long names or special requirements
- • Test display options at different zoom levels
- • Ensure text remains readable on all devices
- • Maintain consistent branding across all polygons
Special Polygon Configuration
- • Assign kiosks to their actual physical locations
- • Use appropriate amenities for visitor convenience
- • Keep amenity polygons near their actual locations
- • Update kiosk assignments when locations change
- • Test special polygon functionality regularly
- • Coordinate with kiosk and amenity management teams
Custom Polygon Content
- • Use clear, concise text for available spaces
- • Include relevant information like square footage or contact details
- • Update custom content regularly to keep it current
- • Use consistent formatting across similar custom polygons
- • Test custom content on different devices and screen sizes
- • Remove custom polygons when no longer needed
Visual Design
- • Use consistent colors for similar polygon types
- • Ensure good contrast between text and background colors
- • Test polygon visibility at all zoom levels
- • Maintain appropriate polygon sizes for readability
- • Use rotation sparingly and only when necessary
- • Keep positioning clean and organized
Ready to Edit Your Map Polygons?
Access the Portal CMS to start editing your center map with detailed polygon configurations.
Access Portal CMS